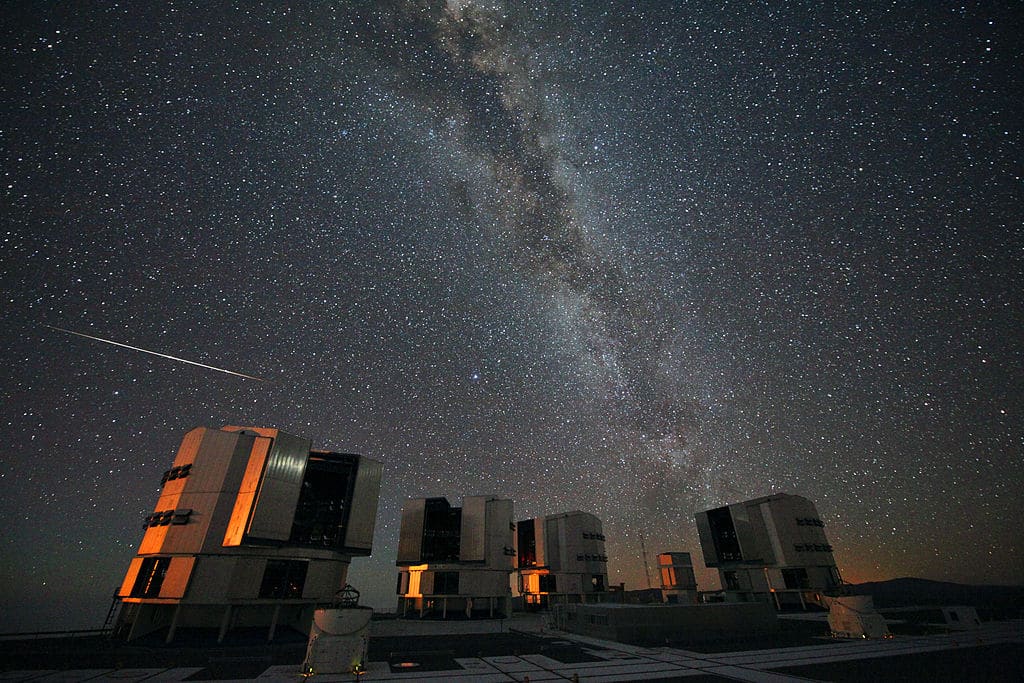
Meteor showers are one of the most fun and exciting activities you can see in the night sky. The thrill of watching a bright meteor streak across the heavens will last long after the meteor has faded. Meteor shower photography is a great way to capture these memories and create an awesome picture. You might be surprised you already have everything you need to photograph meteor showers.
Meteor Showers
Every year, there are dozens of recognized meteor showers. Some last for a few hours, while others stretch out over several days if not weeks. Many don’t produce meteors at rates that you’d even notice a shower was occurring. But a few meteor showers are worth catching – the Quadrantids in early January, mid-August’s Perseids, and the Geminids in mid-December.
Meteor Shower Radiants
Meteor showers happen when Earth passes through a stream of dust-sized particles left behind by a comet or an asteroid. That causes each meteor shower to appear to radiate from a particular area of the sky. That part of the sky is called the shower “radiant.” These radiants are named for the constellation, sometimes a star, where the radiant is located.
Meteor Rate
Meteor shower rates, or the Zenith Hourly Rate (ZHR), standardize the predicted number of meteors seen under optimum observing conditions. These estimate how many meteors would be seen under fully dark skies and with the shower radiant directly overhead, that is, at the zenith. Since most showers will never be directly over your head and most observing sites are not entirely dark, the ZHR numbers will be higher than what can be seen.
When and Where to Look for Meteors
Meteors can appear at any time. Brighter ones can even be seen during daytime hours. But meteor shower activity is notoriously hard to predict. Typically, it’s recommended to look for meteors between midnight and dawn. That is when the radiant is usually highest in the night sky. But some showers, like the Perseids and the Geminids, are often visible between dusk and dawn in northern latitudes.
Dark Sky Locations
If you need help finding a dark sky, check out DarkSkyFinder.com. You can zoom in to locations near you to find a suitable place for photographing meteors. Still at a loss on where to go? Check out these stargazing locations at EarthSky.org.
Using Apps
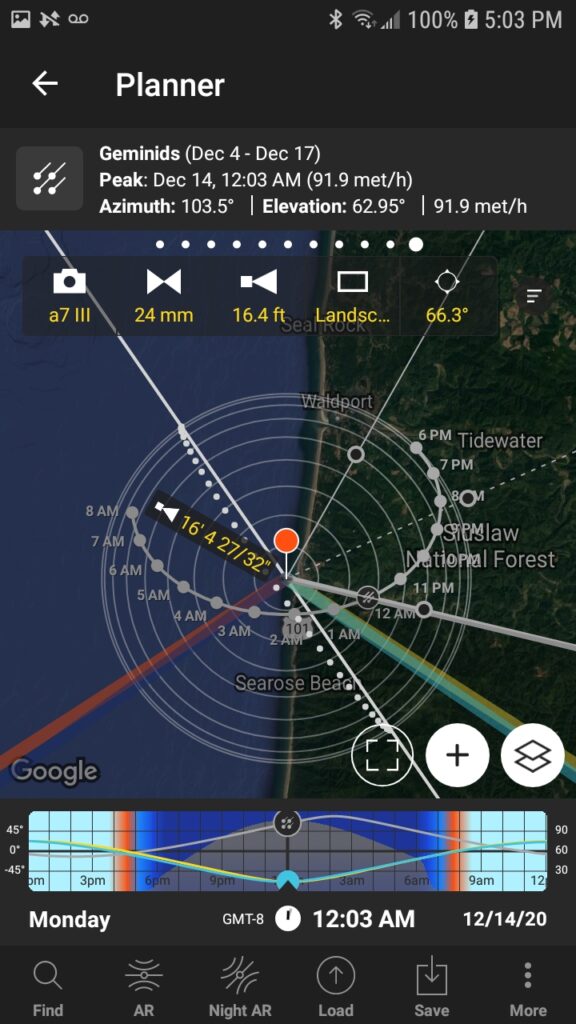
If you’re not familiar with where some of these constellations are in the sky, you can use an app to locate them. I recommend trying a night skies planetarium app, like Stellarium or Star Walk, or the photography apps, PlanIt Pro or PhotoPills, to find the radiant. Look for the Augmented Reality feature in these apps to help you see where the radiant will be.
For more info on these apps, check out MilkyWayPhotographer’s article Best Landscape Photography Apps for 2021.
Viewing in Light Pollution
If you can’t get to a dark sky location, don’t despair! Even in light-polluted locations, it’s not hard to catch Perseids as they are often bright. Bright meteors always look spectacular! It’s just that the dimmer ones will not stand out as much against any light pollution. So go ahead, set up a camera, and spend some time looking.
Peak Night Only?
While peak times for some meteor showers only last a few hours, that’s not the case with the Perseid and Geminid meteors. There’s an excellent chance to see numerous meteors on the nights surrounding peak time. There will be fewer meteors, but you still might want to plan on photographing the Perseids or Geminids on those nights before and after the peak. And if the weather will affect the peak night, plan to go out the night before or the night after.
Where Should I Shoot?
Your first choice should be to avoid city lights and find a location with dark skies. If you’re not in either of those locations, find somewhere with the least light pollution, as you’ll see more meteors with darker skies. Open areas, whether on flat land, hills, or mountain tops, are all great locations.
Top Meteor Showers of the Year
We’ll look at the three meteor showers that typically have the highest peak hourly rates – the Quadrantids, the Perseids, and the Geminids.
Quadrantid Meteors
While not as popular to watch, as it occurs mid-winter in the northern hemisphere, the Quadrantids can rival the better-known Perseids and Geminids showers. It can produce hourly rates of over 100 meteors per hour. While the shower is recognized to occur from December 28th to January 12th, the peak usually happens around January 3rd.
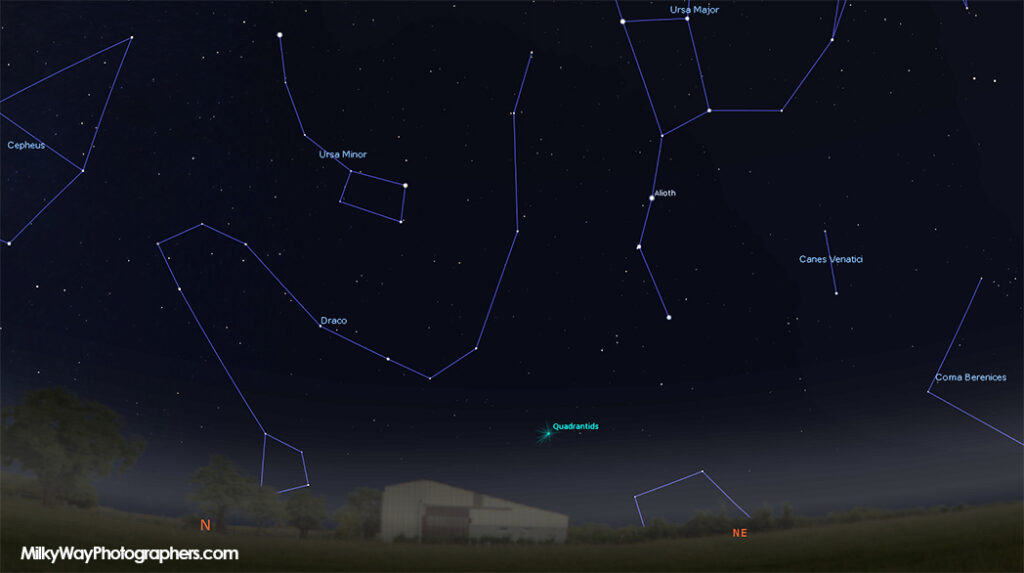
The Quadrantids radiate from the constellation Boötes. Look for it near the handle of the Big Dipper, along the northern horizon in the early evening.
The catch with the Quadrantids is the shower peak typically only lasts about 8 hours, compared to two days for August’s Perseids. Another factor working against the Quadrantids is the meteors are usually faint compared to other showers. To catch this shower, check out the Resources at the end of this article to determine the best viewing time for your location.
Perseid Meteor Shower
From mid-July to the end of August, it’s usually met with warm summer nights in the northern hemisphere. Perseids are fast and bright and often have long streaks across the sky. NASA has determined that the Perseid shower has more bright meteors than any other shower. With an impressive peak rate of 100 or more meteors per hour, the Perseids are the top contender for the year’s best meteor shower.
All these factors make the Perseids excellent for meteor photography.
The Perseid maximum tends to be just before mid-August, near August 12th or 13th. Unlike other showers that peak in a matter of hours, the Perseid shower peak lasts for a few days and is often rewarding to watch.
In the evening, Perseids appear to stream from near the northeast horizon. As the night progresses, they appear to radiate more from overhead, streaming out from the constellation Perseus. You don’t know where that is? That’s OK. I don’t really, either! But I know Perseus is right next to the constellation Cassiopeia, which is easy to find.
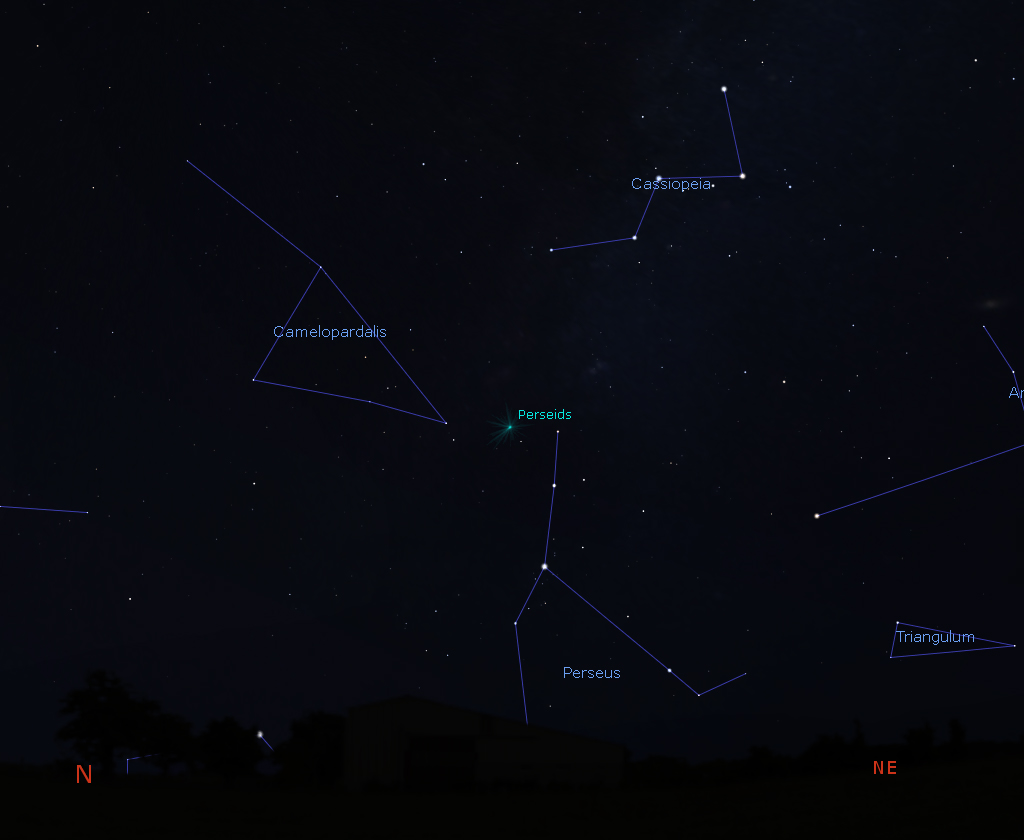
To find Perseus, look to the northeast and find the big “W” shape near the Little Dipper. That’s the constellation Cassiopeia and it’s right above Perseus. You don’t need to aim your camera there; that’s simply where the meteors will appear to originate. They will streak across the sky away from Perseus.
Geminid Meteor Shower
The Geminid meteor shower is arguably the best meteor shower of the year. The Geminid shower is usually active from about December 4th to 17th and typically peaks on December 13th or 14th. The Geminids have a maximum hourly rate of 120, which tops all other meteor showers.
The Geminids appear different than August’s more popular Perseid shower. Perseid meteors are quick and often gone in a flash. Geminids enter Earth’s atmosphere about 40% slower than the Perseids, giving you a better chance to see them. Best of all, the Geminids often make long, intensely colored streaks as they cross the sky. Some even leave smoke trains high in the sky that persist for several minutes, twisting into unusual shapes as they dissipate.
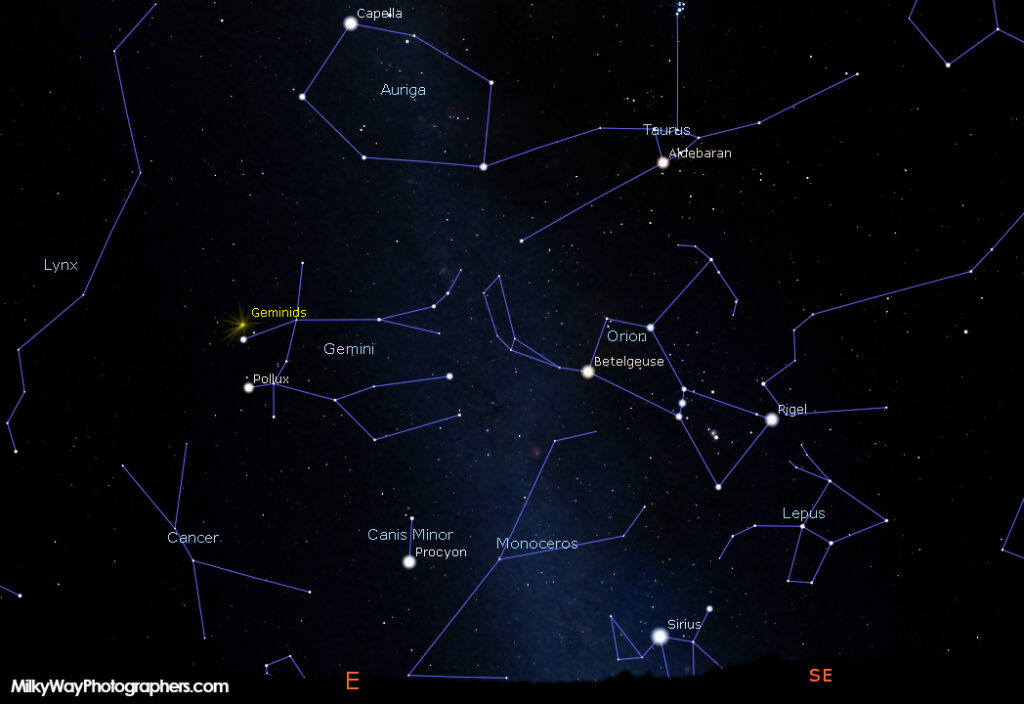
You can find the Geminid radiant near the heads of the Gemini twins. (See the diagram above.) Two bright stars, Castor and Pollux, mark this spot in the night sky. You can follow an imaginary line from the two brightest stars in the constellation Orion to locate the Gemini radiant.
Meteor Shower Photography
Meteor Photography is not difficult. You may already have all the camera gear you need for photographing meteors. You’ll want a camera with manual settings, a sturdy tripod, and an intervalometer to trigger the camera. You’ll probably want extra batteries, as you’ll want to be able to shoot with the intervalometer all night long.
For lenses, use a fast lens with a wide field of view, like a 24mm lens on a full-frame camera, at f/1.4, if you have one. But depending on the type of photo you want, you may want a fish-eye lens or even a longer lens like a 35mm or even a 50mm. We’ll discuss the lens selection below when we look at “Where To Aim Your Camera.”
Try shooting some video if you have a camera that can shoot video under low-light levels, like the Sony a7S series. Set your camera to record at 4K, if available. With luck, you’ll capture the motion of the stars as they streak across the sky.
Where to Aim Your Camera
There are a couple of options to consider when aiming for your camera for meteor shower photography. First, think about the type of photo you want to create. There are, in general, four types of meteor shower photos you can make.
To visualize the types of images, think about movies that show archers shooting arrows. There are typically four types of scenes in these movies. In the first, the camera is aimed at the archers as they launch the arrows into the air, radiating away from them and then raining down towards the camera position. The second shows a side view, with the arrows flying down on their targets – streaking diagonally to the camera’s view. A third shows the arrows flying downward toward their target, looking away from the archers. The fourth type of image is the “all-sky” view, with the arrows flying against the open skies.
The “Radiant” View
We want to catch the meteors streaming away from the radiant point for this first view. To achieve this, aim your camera so the radiant is either centered or slightly to one side of the camera’s field of view. Then set your camera intervalometer to take numerous photos through the night. Try to include some landscape to ground your image and give some perspective.
You may get several meteors in the same frame if you’re lucky. Otherwise, you’ll need to stack several images where you did catch meteors together into a single image.
The “Diagonal Streak” View
The other type of image shows meteors forming parallel diagonal streaks across the frame. For this image, aim the camera 90 degrees away from the radiant. For example, using the Perseid meteors would mean pointing your camera towards the northwest or the southeast.
Think about using a medium-wide or normal lens for this type of photo. Again, you’ll probably want to combine several frames to create the final image.
The “Look Away” View
Aiming your camera towards the sky opposite the radiant will capture meteors as they appear to fall downwards towards the earth. They will travel more vertically in this view than in the “Diagonal Streak” view. Although fewer meteors will appear in this part of the sky, it can create an interesting view.

Pointing your camera away from the radiant captures meteors moving downward.
Photo Credit: Copyright 2021 Aref Alragehi (@arefalragehi). Composite image.
Aref Alragehi captured the image above using a Sony a6000 at ISO 6400. It’s a composite of four sets of images – one for the foreground, one each for the two meteors, and a stack of about 80 frames for the sky from a timelapse sequence. The camera did not move during the exposures. You can see more of Aref’s work at @arefalragehi on Instagram.
The “All-Sky” View
Finally, look for a spot with a wide-open view. You may not have a lens that can photograph the entire sky at once, but it can make your viewing experience more enjoyable!
To get an “All-Sky” photo, aim your camera overhead with a circular fish-eye or a diagonal or “full-frame fish-eye” lens. You will have the chance to catch more meteors by photographing a large sky area. However, these lenses let less light into the camera, so they will not record all the faint meteors that a faster lens would see.
You can still aim your camera upwards if you don’t have a wide or fish-eye lens. Try including the radiant point in the corner of the camera’s view. You may catch the meteors streaking out from the radiant.
Interesting Foregrounds
Always look for a foreground subject that adds interest to your photo. As with other types of night photography, an interesting or exciting foreground strengthens your image.
Camera Settings
Put your camera on the tripod and put on the lens. Don’t wait until it’s dark – have your camera set up and ready to go before dark if you can.
Set your ISO to 1600, or even 3200, if your camera has low noise at higher ISO settings or you use a lens with a slow f/stop. If you use higher ISO settings, you risk blowing out any color you may have in the brighter meteors.
Bring an extra battery, maybe two. Your camera will probably run with one battery for a few hours of non-stop shooting. But you may want to shoot longer, especially if you enjoy the celestial fireworks!
Shoot RAW
Set your camera to shoot RAW files. If you want to shoot JPG+RAW, that’s fine. Just make sure you have RAW selected. Put an empty memory card in your camera. Shooting images continuously, even with an interval of 30+ seconds, will quickly fill up smaller memory cards! Put in a 64 Gig or larger card, or bring a couple of 32 gig cards with you and expect to swap cards mid-shoot.
Intervalometer
Connect an intervalometer to your camera. You don’t need to program it for shooting intervals or a time-lapse. Just set it for continuous shooting. A simple wired remote will work great for this. Some have a locking shutter release button. If you have one built into your camera, go ahead and use it.
Practice in the Light
If this is your first time shooting with an intervalometer, practice before heading out to shoot the Perseids. Some intervalometers are less intuitive to use than others. You’ll be happy you figured out how to use it at home rather than in the field as the meteors are streaking overhead.
Lenses and Focus
Ideally, you want a wide-angle to normal focal length lens with a maximum aperture of f/2.0 or faster. You can get by with f/2.8, but you will capture fewer meteors.
Use a 24mm or wider on full-frame (16mm for APS-C). Set your lens to its widest aperture; meteors move much faster than stars, so you want to let as much light into your camera as possible. If all you have is an f/2.8 lens or a slower lens, go ahead and use it wide open. You will still be able to capture the brighter meteors.
Fish-Eye Lenses
You’ll want to use a circular fish-eye or a diagonal or “full-frame fish-eye” lens to get an all-sky photo. These lenses are typically f/3.5 or f/4. You’ll catch much fewer meteors than with a faster lens, but capturing the entire sky at once could be worth it.
The Sigma 15mm f/2.8 EX DG Diagonal Fisheye is an excellent choice for a full-frame camera and comes in Canon EF, Nikon F, Pentax K, Sony A, and Sigma mounts. The Samyang 12mm F/2.8 ED AS NCS Fisheye is another full-frame diagonal fisheye and is available in the same mounts as the Sigma 15, plus Micro Four Thirds, Fujifilm X, and Sony E mount. If you have an APS-C crop sensor camera, look into the Samyang 8mm F2.8 UMC Fisheye II, which provides a 180-degree view.
As an Amazon Associate, KeyesPhoto.com earns from qualifying purchases.
Lens Warmers
If you are shooting anywhere except the desert – you’ll want a lens warmer. It’s a fabric band with a USB-powered heater inside. You wrap it around your lens and fasten the heater with the Velcro strap. Ensure the heater doesn’t block access to any lens controls or get into your camera lens’s view.
Lens heaters work well, and you will need one sooner or later. You can rubber band a chemical hand warmer to your lens in a pinch. You might want to bring a small microfiber towel to wipe up any moisture that collects on the outside of your camera as the night progresses.
Focusing Your Lens
When setting up to shoot your meteor photos, AFTER setting up the lens warmer, first turn off your autofocus. You don’t want to have your camera accidentally refocus. Then manually focus on the stars. Don’t trust the infinity setting on your lens; actually, focus on a bright star. Take a couple of test shots to ensure you’ve nailed the focus!
Use an app like PhotoPills to check your lens and camera’s maximum exposure time for sharp stars. For a 24mm on full-frame, you’ll probably need to use 20 seconds or less time. Zoom in on your test shots and check for star streaks.
Live View
Turn on your camera’s Live View function and set the ISO to 1600. Find a bright star in the sky, and aim your camera at it, so it’s near the center of your viewfinder. Slowly rotate the focus ring back and forth with your lens in manual focus. As you move past infinity focus, you should see the star become sharp and blurry. Make smaller and smaller motions until you center in on the sharpest focus. Depending on your lens, the star may have a slight red or green tinge – try to minimize it.
If your camera doesn’t have Live View, you can try the “trial and error” method. Manually try to get your best focus and take a shot. Review that image – zoom in and see how sharp the stars look. Then move the focus ring a little to the left or right and take another test photo. Compare it with the previous shot. If it looks sharper, try another shot, moving the focus ring slightly in the same direction. If it is worse, return to where you focused in the initial photo. Just keep trying to make small changes until you find the best focus you can.
Check Your Histogram
Then take some test shots at 10, 15, 20, and 30 seconds. Look at the histogram for each shot. Use the exposure time that places the hump on the histogram about 1/3rd from the left side. Don’t use one too far to the middle, as you’ll blow out the sky in your images.
If the hump of your histogram is not about 1/3rd from the left with the shutter speed you need, you may want to bump up your ISO. You usually don’t need to go too high, as we don’t want to wash out any color that may be present. So resist the urge to use a high ISO. If your skies are relatively bright, and your histogram is near or above the middle of the histogram, go ahead and drop it a little.
Shutter Speed and Brightness
Remember that shutter speed will not affect the brightness of a meteor on your image. ISO and f-stop do, but not shutter speed. Set your shutter speed to control the sharpness of the stars, and leave your f-stop open as much as possible to let as much light from the meteor into your camera. Then use the ISO to control the histogram. Simples.
Shoot Away!
Ooh, here’s my favorite part – set your intervalometer to shoot shot after shot after shot, and let it go! Now it’s just a matter of luck getting a bright meteor to pass right in front of your camera!!
If you are shooting with a DSLR, you will want to block your camera viewfinder to keep stray light from striking the sensor. Mirrorless users, don’t worry; you don’t need to do this.
Enjoying the Night
Bring a lawn chair, a blanket, a sleeping bag, and something warm to drink. (And don’t forget the bug spray.) Then lay back and watch the show as your camera shoots away. Bring a friend to share in the excitement of seeing a bright fireball!
Remember to bring warm clothes! Even mid-summer nights can get chilly. Bring extra layers to adjust your comfort level as the night progresses.
Start Looking After Twilight
You can start looking for meteors shortly after twilight ends. You have a better chance of seeing “Earthgrazers” early at night. Earthgrazers make long streaks as they skim across the thinner upper atmosphere. Perseids can also be colorful and leave long trails in the sky as they burn up.
Plan on Staying Out Late
As the night proceeds, the radiant will rise higher. This will help produce more meteors across the sky as dawn approaches.
Keep in mind that meteors can appear anywhere in the sky. You don’t need to concentrate on looking at the radiant. Look into the darkest area of the sky for your location. In early August 2020, I saw a meteor traveling perpendicular to the radiant. But it might have been a Perseid – it was bright and had a very long trail.
Fireballs!
Some meteor showers, like the Perseids are known for producing “fireballs.” Fireballs are brighter than regular meteors and can glow longer than a regular meteor streak. Some fireballs explode high in the Earth’s atmosphere and are technically called “bolides.” You don’t need to worry about either fireballs or bolides, so enjoy them, as they can be spectacular!
Post-Shower Peak Meteors
Most people get wrapped up catching a meteor shower during the predicted peak. But data shows that the nights before or after the peak can be extremely rewarding, with hourly counts of about one-half of the peak zero hourly rates.
Post-Processing Meteor Photos
Later, after you’ve caught up on your sleep, look through your photos. Hopefully, you caught some good ones. If it’s a good shower and you’ve captured numerous meteors, you can blend them into one image. It makes a cool photo, and you will probably see that the meteors radiate from one location in the sky.
Sift through your photos and identify the shots containing a meteor. Tag them for use in your composite. Once you have tagged all your images with meteors, load them into a stack in Photoshop. Put each image in as a separate layer. Extract each meteor from the image by masking out the rest of the image. Blend the masked layers into a final composite. Include one image without masking for use as your background.
My Meteor Shower Gear
My Milky Way shooting gear is similar to what I use for meteor photography. I plan to use my Sony mirrorless cameras, full-frame and APS-C.
Cameras
- Sony a7 IV – 33 MPixel Full-Frame Camera. I typically use several cameras to shoot various compositions through the night as I let both my a6300 shoot time-lapses. For meteor photography, I’m going to set up both Sony a7 III with 24 MP and the a7 IV up and let them shoot away to increase my chance of catching a meteor.
- Sony a6500 – 24 MPixel APS-C camera. I have two a6300, my go-to cameras for shooting time-lapses. The a6500 has superseded the a6300.
Lenses
- Sony FE 20mm F1.8 G Full-Frame Ultra-Wide Angle G – This is my go-to lens for meteors. It’s wide enough you can cover a lot of sky, but not too wide that the streaks are too small. It will be on my a7 IV.
- Sony E-mount FE 24mm F1.4 GM – This fast and wide lens performs well wide open, ideal for shooting meteors. It’s going on my a7III.
- Rokinon 24mm F1.4 ED AS IF UMC – This will go on one of my a6300. It’s equivalent to 35mm on full-frame when on my APS-C cameras. I’ll point directly at the radiant.
- Sigma 14mm f/1.8 DG HSM ART – This lens is nice and wide, but it doesn’t let in as much light as my 24mm lenses. It’s going on the other a6300.
- Rokinon 16mm f/2.0 16M-E – this will go on the a6000. It’s equivalent to 24mm on full-frame when on my APS-C cameras.
Tripod
- FEISOL Tournament Tripod CT-3342 Rapid – My one carbon tripod. The rest of my tripods are aluminum Manfrotto/Bogens from the 90s.
- Feisol LB-7567 Leveling Base for CT-3342, 3442 Tripods – Stop wasting your time getting your tripod level by adjusting the legs. Use this instead.
- Benro 3-Way Geared Head (GD3WH) – Stop wasting time with a ball head trying to get your camera level. Use this instead.
Additional Gear
- SanDisk 128GB Extreme SDXC UHS-I Card – I can get over 2000 images on these with my cameras.
- Black Diamond Storm Headlamp – Works great!
- CooWoo Lens Heater / Dew Remover – Keep moisture from condensing on your lens with a Lens Heater.
- Neewer 2 Pack Black Heavy Duty Photographic Studio Video SandBag – I don’t usually put rocks in these, but I use it to hold my batteries and cell phone.
- Sony NPFZ100 Z-series Rechargeable Battery Pack for Alpha A7 III, A7R III, and A9 Digital Cameras
- Case Relay USB Dummy Battery – Power your camera for hours with an external battery pack. You’ll need a dummy battery for your camera to go with it – here’s an AC charger with a Sony NP-FW50 dummy battery adapter.
- New Version AC-PW20 Dual USB Power Adapter DC Coupler Replacement NP-FW50 – this device is the only way I’ve figured out to get unending power for my Sony cameras. It runs until the battery pack is dead.
Happy Meteor Photographing
Let us know how your shoot went in the comments below. Good luck!!
Resources For More Info:
The American Meteor Society is an excellent resource to learn about meteors
Check out NASA’s webpage on the Perseid Meteor shower.
For a more detailed 2021 meteor analysis, try the International Meteor Organization.
Your one-stop shop for the latest in meteor activity: MeteorNews.Net.
For a complete and thorough discussion, check out the following video, BlogChat: How to Process Meteor Shower Radiant Composite Images. Matt Hill and Chris Nicholson from National Parks at Night go through all the steps you’ll need to create your meteor shower composite photo.
Cover Photo Credits: Siarakduz, Perseid, CC BY-SA 4.0
An earlier version of this article was initially published on MilkyWayPhotographers.com
4186 230211