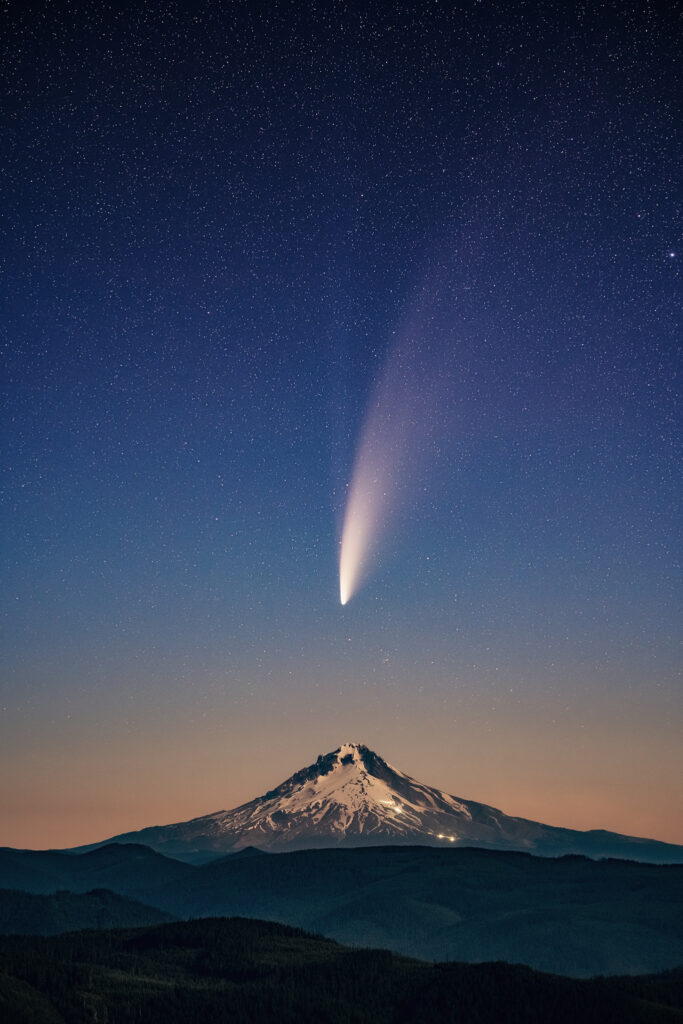
15 images stacked, ISO 3200, f/2.5, 3.2 seconds.
Image processed by Marybeth Kiczenski.
About the Image
- Image taken: 7/11/20
- Sony a7iii
- Sigma Art 105mm f/1.4
- 3200 ISO
- f/2.5
- 3.2 sec
- Stack of 15 photos
- Sky was processed separately from the foreground.
To Capture a Comet
I was interested in getting a photo of the comet which was a prominent feature of the image. That meant I would need to use a longer than standard 50mm lens. I’d seen shots online of the comet taken with everything from ultra wides to 300mm. Around 200 mm, the comet and nearly all of the tail filled the frame. So I decided I wanted to use a lens around 135mm.
Planning, Planning, Planning…
With that goal in mind, I started to think about what kind of foreground I could capture in the frame at the same time as the comet that wasn’t too far away. I knew the comet would be at a compass direction between N and NE. The first foreground that came to mind was Mt Hood. My usual Mt Hood locations were all too close to the mountain and looking in the wrong direction. After several hours of searching Google Maps, Google Earth, Stellarium, and PlanIt Pro for Photographers, I found an excellent location. It was 30 miles from the top of Hood, and it didn’t have any ridges or peaks between to obscure the view.
Better Than I Hoped
I was excited to see that the comet was going to pass directly over the peak of Mt. Hood. I had expected it would rise just to the right of the summit.
Capturing the Comet
I took the photos at around 3:20 am as the comet passed over the top. A rented Sigma Art 105 mm f/1.4 lens was used for all the frames. I stopped the lens down to f/2.5 to sharpen the corners of the shots. I used PhotoPills to determine the longest shutter speed I could use and still get the stars to be points. And then, I set my camera’s built-in intervalometer to take 15 images.
Processing
For processing, my friend Marybeth Kiczenski, shelbydiamondstar on IG and FB, offered to process it for me. Since I love the look of her astro landscape photos, I jumped at her offer. She used Sequator to stack the frames for the sky. Marybeth then stacked the same images in Photoshop for the foreground. She then loaded both as layers into Photoshop and applied a mask to blend the two. Next was color grading it using Photoshop’s “Selective Color” function. She flattened the image and then used several functions in the Nik Collection. Usually, she uses Topaz Denoise, but she felt this photo didn’t need it.
I’m super happy with Marybeth’s results. I think it speaks for itself!